How My Work Looks Before It Is Done: First Stage of the Falcon
This is the first in a series of posts which will show the progression of a pen and ink drawing on my drawing table. I intend to upload a scan each day, although I will likely skip days on this piece while I show other work being done. This scan in particular was made about two weeks ago. For some days I have multiple scans to show steps of the process, so this will not be seen in real time, but I’ll try to get closer to real time once I’m caught up and the drawing is completed.
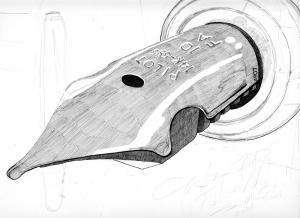
After I’m pretty much satisfied with the pencil drawing I begin by blocking out areas and laying down layers of hatching. Though this first layer looks fairly hairy due to the rows of parallel lines, the transitions between the rows of lines should become invisible as subsequent layers go over, crossing those lines in other directions. That’s the theory anyway.
The subject is a Pilot Custom 742 fountain pen nib. It is the FA or «Falcon» style, with a unique shape. The cutouts on either side make the nib more flexible, which makes for variation in line width. While this model is not quite flexible enough for advanced calligraphy, it makes delightful lines for everyday writing and drawing. The pencil work was done without reference photography. Instead, I used a loupe and held the nib about an inch and a half from my eye.